INTRODUCTION
The terminator is a robot from a movie that time travels into the past to save someone. I love watching robot movies and got goosebumbs after watching terminator. I decided to make a device that can let me see things like terminator does.
Basic idea
The ideas was to make a camera see things, apply filters to what the camera sees and look at the output instead of looking at the object directly like the apple vision.
My idea was to mount a camera and raspberry pi onto my universal VR headset and cast the input from the camera onto a phone through wifi inside the headset after applying face recognition, hand recognition and cool overlays.
Components used
- Webcam - For taking video input.
- Raspberry pi 3 - This takes the camera input, applies the overlays and casts to the phone
- A VR headset - To see the output.
- A smartphone - to be put inside the vr headset as a display.
- A Powerbank - To power the contraption.
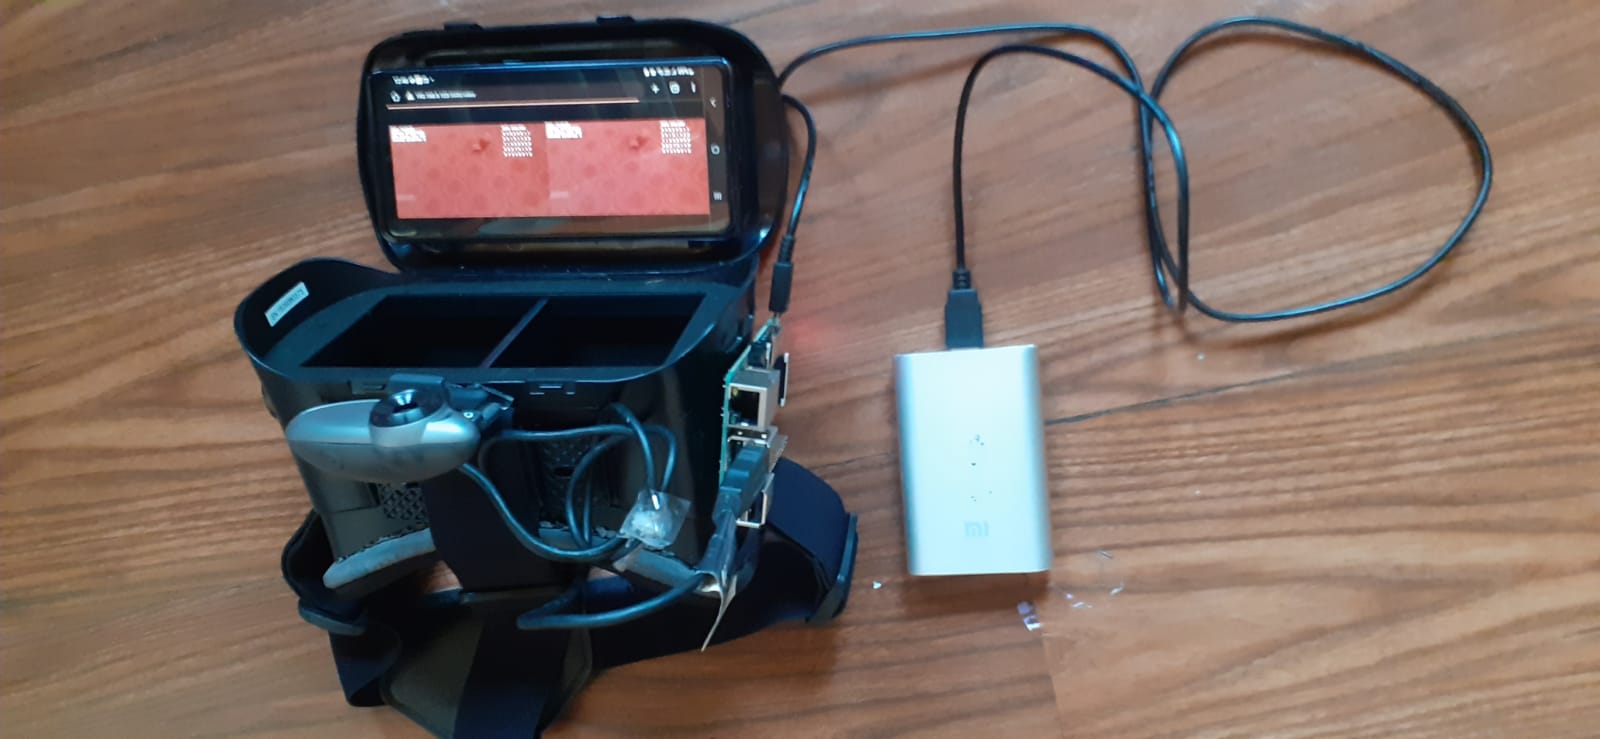
How it works
The raspberry pi takes input from a webcam whose footage is passed through a python script, the script then applies overlays after detecting faces and hands with mediapipe and a local pretained face recognition model. The modified frames are streamed onto a website on the local wifi network through a library called flask. The frames are updated live at 60 frames per second, allowing for a more realistic feed.
Applications
This project can be used for so many things apart for fun. For example,
- Real time on road directions showing you where and which road to walk on by displaying arrow overlays on the road itself to navigate with ease.
- Detailed interactive overlays for engines and machines for mechanics to build and identify errors with ease.
- A vision enhancing headset for search and rescue with thermal vision, zoom capabilities and people detection.
- A multipurpose headset for the military or police force to find and catch suspects and criminals by checking their information and appearence against criminal records.
- A headset for students to easily search questions and solve doubts using a chatbot or the internet.
Upgrades and ideas
We can improve this base model in so many ways.
- Using a better camera with zoom capabilities and high definition recording.
- Switching to a better portable computer like a raspberry pi 5.
- Lighter and better powerbank.
- Headset physical controls.
- Recording and picture capabilities.
- Number plate detection
- Text recognition
Conclusion
This was a great project to research and apply knowledge about agumented reality and machine learning in camera feed. This may be the future for artificial intelligence application and a common gadget used in daily life.
Code
1
2
3
4
5
6
7
8
9
10
11
12
13
14
15
16
17
18
19
20
21
22
23
24
25
26
27
28
29
30
31
32
33
34
35
36
37
38
39
40
41
42
43
44
45
46
47
48
49
50
51
52
53
54
55
56
57
58
59
60
61
62
63
64
65
66
67
68
69
70
71
72
73
74
75
76
77
78
79
80
81
82
83
84
85
86
87
88
89
90
91
92
93
94
95
96
97
98
99
100
101
102
103
104
105
106
107
108
109
110
111
112
113
114
115
116
117
118
119
120
121
122
123
124
125
126
127
128
129
130
131
132
133
134
135
import cv2
import datetime
import numpy as np
import random
from flask import Flask, Response
import mediapipe as mp

app = Flask(__name__)

# Initialize the camera
cap = cv2.VideoCapture(0)
if not cap.isOpened():
    print("Error: Unable to access the camera.")
    exit()

# Load the pre-trained MobileNet-SSD model for face detection
face_prototxt = "C:\\Users\\aadit\\Downloads\\deploy.txt"
face_model = "C:\\Users\\aadit\\Downloads\\res10_300x300_ssd_iter_140000_fp16.caffemodel"
face_net = cv2.dnn.readNetFromCaffe(face_prototxt, face_model)

# Initialize MediaPipe Hands
mp_hands = mp.solutions.hands
hands = mp_hands.Hands(static_image_mode=False, max_num_hands=2, min_detection_confidence=0.5)
mp_drawing = mp.solutions.drawing_utils

# Shared variables
last_cpu_speed = 3.00
num_humans_detected = 0
number_lines = []

# Generate random rows of numbers for "DATA ANALYSIS"
def generate_random_numbers(rows, cols):
    return [' '.join(random.choices("0123456789", k=cols)) for _ in range(rows)]

# Fake CPU speed generator
def generate_cpu_speed(last_speed):
    change = random.uniform(-0.03, 0.03)  # Random fluctuation
    new_speed = last_speed + change
    new_speed = max(2.50, min(3.50, new_speed))  # Constrain between 2.50 GHz and 3.50 GHz
    return f"CPU Speed: {new_speed:.2f} GHz", new_speed

# Main frame processing function
def process_frame(frame):
    global last_cpu_speed, num_humans_detected, number_lines

    # Resize the frame to use the whole window
    frame = cv2.resize(frame, (960, 540))

    # Apply a darker red tint overlay
    red_tint = np.zeros_like(frame)
    red_tint[:, :, 2] = 150
    frame = cv2.addWeighted(frame, 0.5, red_tint, 0.5, 0)

    # Perform face detection
    blob = cv2.dnn.blobFromImage(frame, 1.0, (300, 300), (104.0, 177.0, 123.0))
    face_net.setInput(blob)
    detections = face_net.forward()
    num_humans_detected = 0
    for i in range(detections.shape[2]):
        confidence = detections[0, 0, i, 2]
        if confidence > 0.3:  # Confidence threshold
            num_humans_detected += 1
            box = detections[0, 0, i, 3:7] * np.array([960, 540, 960, 540])
            (startX, startY, endX, endY) = box.astype("int")
            cv2.rectangle(frame, (startX, startY), (endX, endY), (255, 255, 255), 2)
            label = f"{confidence * 100:.1f}%"
            cv2.putText(frame, label, (startX, startY - 10), cv2.FONT_HERSHEY_SIMPLEX, 0.5, (255, 255, 255), 2)

    # Perform hand detection
    rgb_frame = cv2.cvtColor(frame, cv2.COLOR_BGR2RGB)
    results = hands.process(rgb_frame)
    if results.multi_hand_landmarks:
        for hand_landmarks in results.multi_hand_landmarks:
            mp_drawing.draw_landmarks(
                frame, hand_landmarks, mp_hands.HAND_CONNECTIONS,
                mp_drawing.DrawingSpec(color=(0, 255, 0), thickness=2, circle_radius=2),
                mp_drawing.DrawingSpec(color=(255, 255, 255), thickness=2, circle_radius=2)
            )

    # Add diagnostic text
    now = datetime.datetime.now()
    cpu_speed_text, last_cpu_speed = generate_cpu_speed(last_cpu_speed)
    diagnostics = [
        f"TIME: {now.strftime('%H:%M:%S')}",
        f"STATUS: OPERATIONAL",
        cpu_speed_text,
        f"HUMANS DETECTED: {num_humans_detected}",
    ]
    y_offset = 20
    for text in diagnostics:
        cv2.putText(frame, text, (10, y_offset), cv2.FONT_HERSHEY_SIMPLEX, 0.6, (255, 255, 255), 2, cv2.LINE_AA)
        y_offset += 20

    # Add "DATA ANALYSIS" text and random numbers on the right
    if not number_lines or random.random() < 0.1:  # Update numbers occasionally
        number_lines = generate_random_numbers(5, 8)

    cv2.putText(frame, "DATA ANALYSIS", (700, 30), cv2.FONT_HERSHEY_SIMPLEX, 0.6, (255, 255, 255), 2, cv2.LINE_AA)
    x_offset = 700
    y_offset = 60
    for i, line in enumerate(number_lines):
        cv2.putText(frame, line, (x_offset, y_offset + (i * 30)), cv2.FONT_HERSHEY_SIMPLEX, 0.6, (255, 255, 255), 2, cv2.LINE_AA)

    return frame

# Generate frames for the video feed
def generate_frames():
    try:
        while True:
            ret, frame = cap.read()
            if not ret:
                print("Failed to grab frame.")
                break

            # Process the frame
            processed_frame = process_frame(frame)

            # Create side-by-side stereo frames
            stereo_frame = np.hstack((processed_frame, processed_frame))

            # Encode frame to JPEG format
            _, buffer = cv2.imencode('.jpg', stereo_frame)
            frame = buffer.tobytes()

            yield (b'--frame\r\n'b'Content-Type: image/jpeg\r\n\r\n' + frame + b'\r\n')
    finally:
        cap.release()
        cv2.destroyAllWindows()

@app.route('/video')
def video_feed():
    return Response(generate_frames(), mimetype='multipart/x-mixed-replace; boundary=frame')

if __name__ == "__main__":
    app.run(host='0.0.0.0', port=5000)